Mastering the Art of Process Mapping: A Time-Tested Approach to Business Success
What Is Process Mapping?
All businesses run on processes; some are smooth, others, not so much. Fortunately, process mapping is a simple and powerful practice of creating visible workflows that capture each step and sequence of how your business runs. Think of it as a blueprint that reveals the "invisible assembly lines" governing your business processes.
In today’s fast paced environment, one often overlooked tool for improving productivity, profitability, and customer satisfaction is process mapping. Originally developed in the 1920’s this time-tested method has evolved to become the go to method for modern business operations. From onboarding new clients to managing content production and customer support, process mapping will help you identify what’s working and what’s getting in the way.
In this article, we’ll break down the fundamentals of process mapping, explore its practical applications, and outline actionable steps for creating and improving your process maps.
While process maps originally helped manufacturing teams design assembly lines, they now serve broader purposes. Small business owners and entrepreneurs use process maps to outline workflows like invoicing, sales calls, content production, or customer support. By making intangible processes visible, process mapping helps identify inefficiencies, streamline workflows, and improve outcomes.
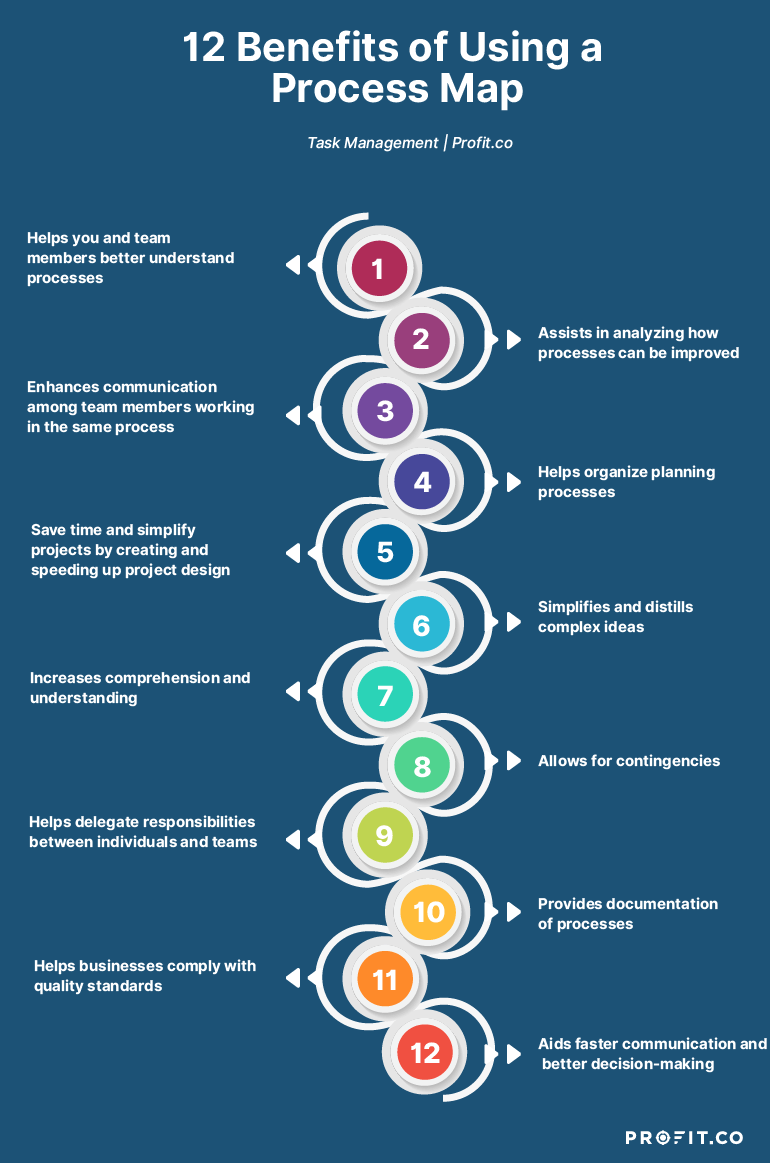
The Benefits of Process Mapping
Why should you invest time in process mapping? You don’t have to be a corporate giant to benefit from better processes, so whether you’re a small business or a one-man show looking to create more consistency, here are a few key ways process mapping helps you:
- Bring Clarity to Your Operations: By mapping out your processes, you can see every step involved, from start to finish. This clarity helps avoid miscommunication and ensures consistency.
- Identify Bottlenecks: Process maps make it easy to identify delays, duplicated work, and other inefficiencies that slow things down.
- Improve Team Collaboration: Creating a process map as a team is a great way to spark and encourage discussion and align expectations, leading to better insights and solutions.
- Enhance Productivity: By identifying and eliminating wasted time or effort, process maps help you and your team focus on value added activities.
- Provide Better Customer Experience: Process mapping allows you to see the journey from the customer’s perspective, enabling you to refine touch points and ensure satisfaction.
How to Create a Process Map
To create a process map, you don’t need special software, just a clear goal that defines your scope. Make sure to use key symbols and map out each step logically. Here’s a step-by-step guide:
1. Define the Scope
Before diving in, decide the boundaries of your process. Ask yourself:
- Where does the process start?
- Where does it end?
For example, if you’re mapping the customer journey, your scope might start with a potential lead and end with a satisfied customer. A clearly defined scope helps you focus on the most critical aspects of the process.
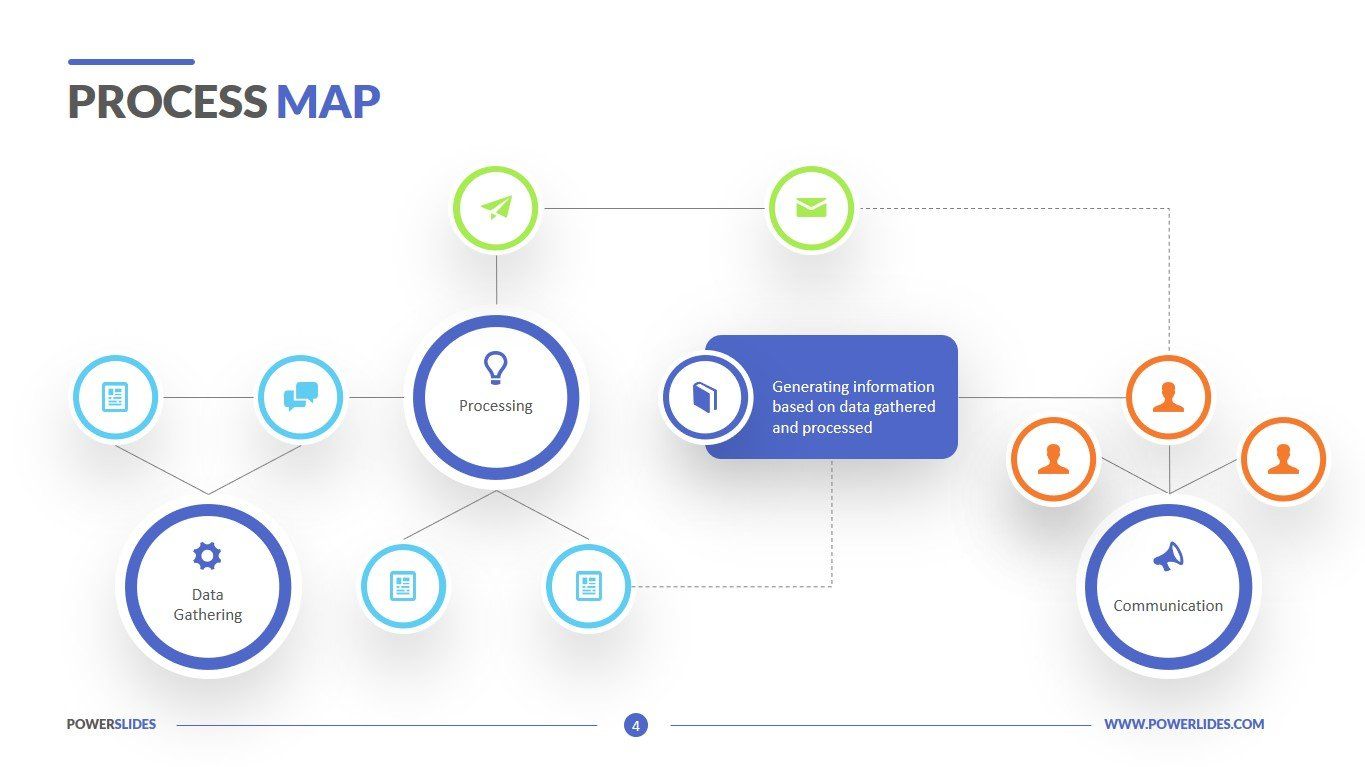
2. Use Key Symbols
While there are over 20 symbols used in formal process mapping, keep it basic. Small teams can start with these four basics:
- Rectangle (Step): Represents an action or task (e.g., "Send invoice").
- Diamond (Decision): Represents a decision point with multiple outcomes (e.g., "Was the proof approved?").
- Rounded Rectangle (Start/End): Marks the beginning or end of a process.
- Arrow: Indicates the flow or sequence of steps.
3. Map the Steps
Ask, “What happens next?” after each part of the process. Use rectangles to document each action, ensuring that you use clear, action based language, i.e., begin with a verb (e.g., “Script video,” “Film video”) to describe the activity clearly.
4. Identify Decision Points
Insert diamonds wherever decisions influence the flow of the process. For example:
- Decision: “Was the proof approved by the customer?”
- If yes, move to the next step.
- If no, branch off into a revision process.
5. Avoid Duplication
Be careful not to duplicate steps unnecessarily. If multiple paths in your process lead to the same outcome (e.g., “Order paid”), represent that outcome only once to maintain clarity.
6. Keep It Linear
Whenever possible, design your process map in a linear format. This ensures the workflow is easy to follow. If two actions occur at the same time, show them stacked vertically. Use arrows to illustrate any backward steps for rework or revisions.
Common Pitfalls and How to Avoid Them
Even seasoned process mappers can fall into traps. Keep an eye out for these pitfalls:
- Overcomplicating the Map: Stick to the basics, especially when starting out. Excessive details can confuse the team and obscure the main objectives.
- Ignoring Team Input: Involve team members in creating the map. Their firsthand knowledge ensures accuracy and encourages buy in.
- Failing to Review Regularly: Processes evolve over time. Revisit your maps periodically to ensure they remain relevant and effective.
When to Use Process Mapping
There are two primary scenarios where process mapping proves invaluable:
1. Improving Existing Processes
When inefficiencies, delays, or miscommunications arise, process mapping helps uncover the root causes. Add layers to your map, such as:
- Customer Journey Insights: Map out customer emotions and experiences at each stage.
- Time Costs: Note how long each step takes to identify bottlenecks.
- Workstreams: Assign color codes to track handoffs between departments or team members.
2. Creating New Processes
Creating a new workflow? Launching a new service? Process mapping helps organize your thoughts and ensure nothing is overlooked. Start with the desired outcome and work backward to outline each step needed to achieve it.
Tools for Process Mapping
You don’t need fancy software to create a process map, just a method that works for your business. Some of the most effective maps are made with basic tools like:
- Whiteboards and Sticky Notes: Perfect for brainstorming sessions with your team.
- Digital Whiteboards: Tools like Canva, Miro, or
Lucidspark allow for infinite space and real-time collaboration with remote teams.
- Slide Decks: PowerPoint and
Google Slides are simple options for creating digital maps.
The best tool is the one you’re most comfortable using. Start with what you have and scale up as needed.
Transforming Your Process Maps into Actionable Improvements
Once you’ve mapped your current process (also known as an as-is map), the next step is optimization. Tailor your improvements based on your goals:
1. Improving Customer Experience
Walk through your customer journey and your processes to highlight pain points. Consider asking:
- How does the customer feel at each stage?
- Are there steps that could be simplified or eliminated?
2. Enhancing Productivity
Focus on reducing handoffs and delays. Assign responsibilities clearly and look for areas where tasks can be automated or streamlined.
3. Boosting Profitability
Calculate the time and cost associated with each step. Identify areas where savings can be achieved without sacrificing quality.
Real-World Applications of Process Mapping
You don’t need to be a corporate giant to benefit from process mapping; it’s a valuable tool for businesses of all sizes. Here are a few examples of how it can be applied:
- Small Business Owners: Streamline operations like onboarding clients, invoicing, or delivering products.
- Content Creators: Optimize workflows for producing videos, blogs, or social media campaigns.
- Customer Support Teams: Improve ticket resolution times and enhance customer communication.
The Takeaway
Process mapping is a powerful exercise that turns invisible workflows into simple tangible diagrams that you can understand and improve. Whether you’re troubleshooting existing processes or designing new ones, the clarity and insights gained are invaluable.
By making your processes visible, involving your team, and continuously refining your maps, you’ll unlock efficiencies, improve customer experiences, and ultimately drive profitability. So grab a whiteboard, some sticky notes, or your favorite digital tool, and start mapping your way to success today!