A Step-by-Step Beginners Guide to ConvertKit Setup
Thinking of monetizing your blog? Or maybe you need email marketing campaigns that convert to more clients for your business? Either way, ConvertKit is just the tool you need to take your campaigns to the next level and increase your cash flow.
This fantastic tool allows you to send out your email newsletters to tons of people hassle-free. It also helps you consolidate your mailing list and makes the sign-up process more straightforward. With
ConvertKit you can automate your email and email marketing. It also allows you to build free landing pages create sales funnels. You can even send your newsletter to a predetermined segment of your subscribers.
Besides the obvious convenience, this is one of the best ways to increase traffic to your website. You might also be wondering how this tool can help the monetization of your blog. Let’s look at a few numbers. Email marketing software is important for the success of your small business.
Over 70% of people in the US prefer to get communications via email, and the Return on investment (ROI) on email marketing can be as high as
$42 for every $1 spent. If you run an e-commerce store, you might be interested to know that email marketing can help you regain at least 8% of abandoned carts and give you a 4%+ increase in total sales. These figures are pretty impressive.
However, to maximize the benefits of email marketing, you need tools that can handle sending out large numbers of marketing campaigns. Your regular business email is not equipped to handle such numbers.
Navigating ConvertKit and all its marvelous features as a beginner might seem intimidating. That is why we decided to give you a step-by-step guide on how to get started.
In this article, we will go through the following steps in detail:
How to set up your ConvertKit account?
How to create a form in ConvertKit
How to add the form to your website
How to create a broadcast (newsletter) in ConvertKit and send your first email
How to create a sequence in ConvertKit
How to create an automation in ConvertKit
Excluding/ Tagging subscribers from email sequence in ConvertKit (creating segments)
Step 1: Setting up your ConvertKit account
The first step is, of course, to create an account. So head over to convertkit.com to set up an account. You will see a similar page to the one below. One thing I love about ConvertKit is that you can get an account for free if you have less than a 1000 subscribers. This free plan will help you to see if ConvertKit is for you.
ConvertKit also offers several plans based on how many subscribers you have on your mail list. If you have 1000 subscribers, you pay $29 a month. The price is higher the more subscribers you have.
Once you’ve signed up, you’ll get an option to choose whether you are migrating from another provider or you are starting afresh.
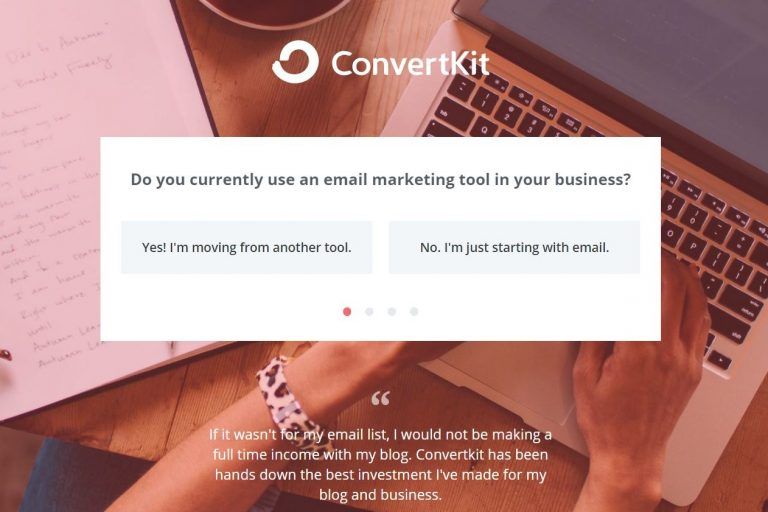
For the purposes of this guide, I will assume that you don't have any subscribers at the moment and are starting from scratch. So click on the ‘No. I’m just starting with email’ button.
If you do have a subscriber list, then choose the other option. If you have a mail list but aren’t sure, you can just start afresh as ConvertKit setup allows you to import your existing subscribers later.
After opening an account and choosing your plan, ConvertKit will need to approve your account. To do this, they need to make sure that you actually have a functioning website, so provide your URL so that your account is approved.
Now, just follow the simple login instructions, and that’s it! The next screen you see should be something like this...
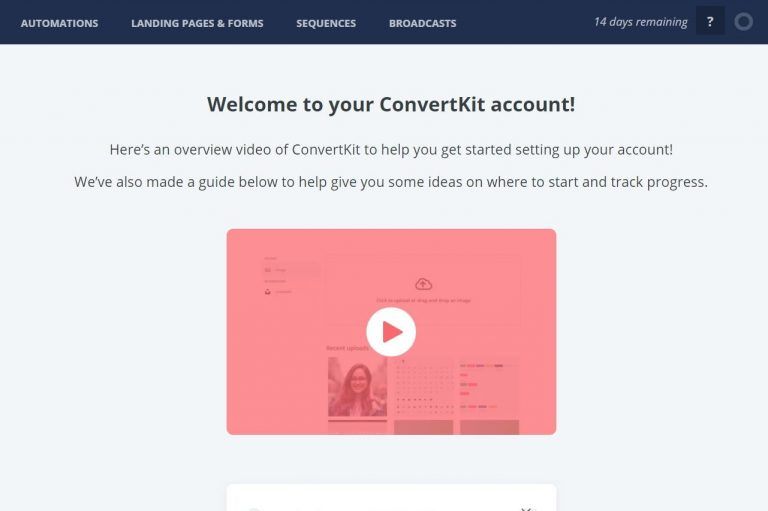
Now all you need to do is follow a few quick and simple things to set up your account.
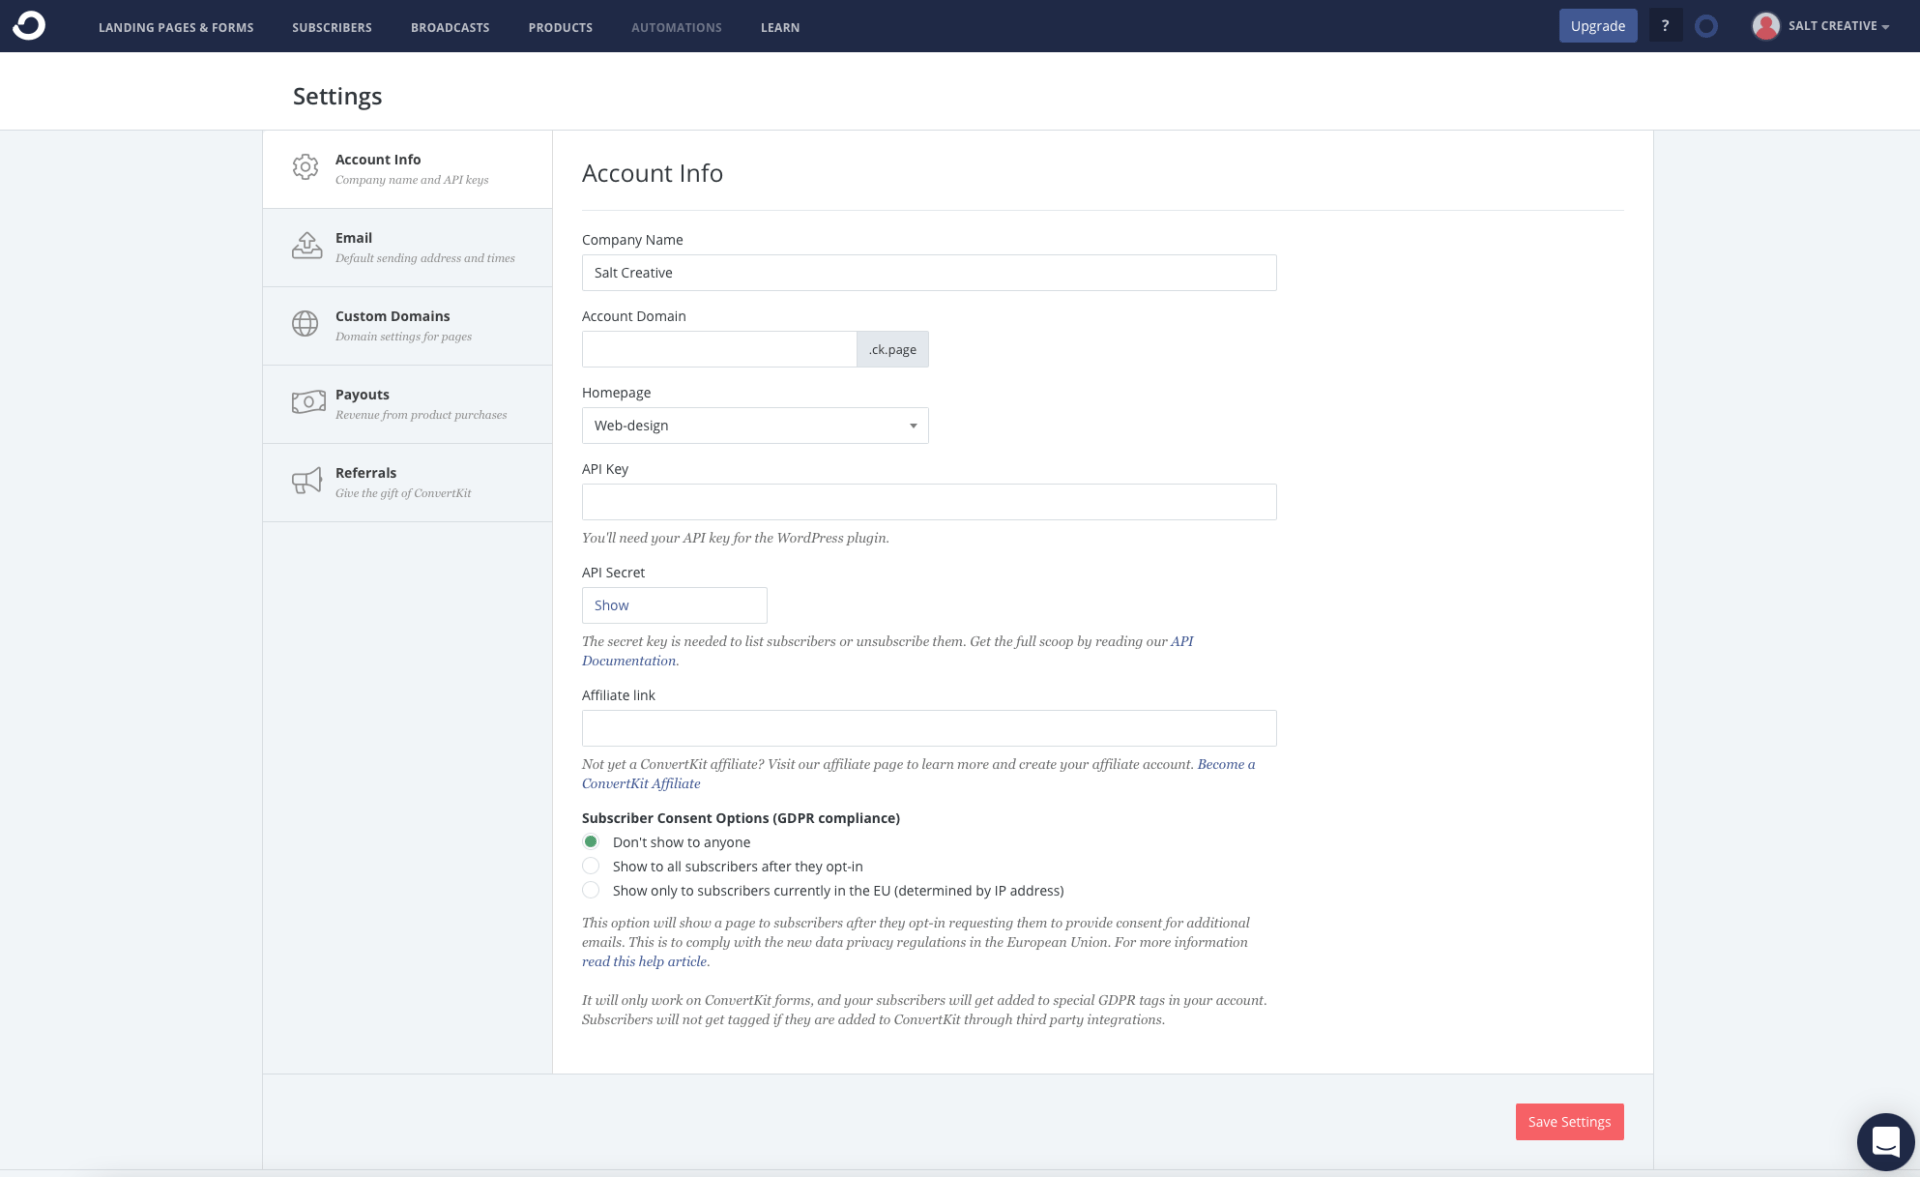
The first step is to click the profile picture in the top right-hand corner and select the ACCOUNT SETTINGS tab from the drop-down menu. A screen like the one below will pop up.
ConvertKit Tutorial 2021 (Step-by-Step Email Marketing Tutorial)
Enter all your details in the Account Info, Profile, and Email settings. (If you’ve chosen the free trial option, you can leave billing for later when you make a decision).
In the Email Settings tab, you will see the word ‘pending’ next to your email address. You’ll need to confirm your email address before ConvertKit allows you to send emails. This is required by international spam laws, so don’t skip this part, or you might face fines if you’re reported. So ensure that you check your email; there will be instructions on confirming your email address.
On this page, you’ll also notice that you need to add your physical mailing address. While you don’t necessarily need to put your actual home address, you cannot leave it blank according to international laws.
You can use a PO Box or look for companies that offer a free address and only charge you if you receive anything. Alternatively, ConvertKit allows you to use its address for email marketing purposes.
On the rare occasion that you ever receive any mail to that address, ConvertKit will scan it, pick out the customers it’s intended for and email you the PDF version.
Step 2:
Creating a form
The next step is to create a form. This form is essential because it collects email addresses from your new subscribers.
For every sign-up possibility, you need to add a form. For example, if you want to create a popup on your homepage, this form is the first one you need to have.
Next, you’ll want to add another form which, for example, can be a sign-up form to your blog sidebar.
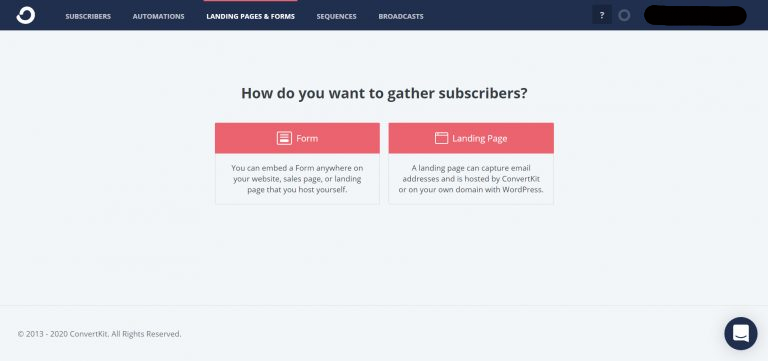
To add a new form on ConvertKit, click on the ‘+ Create Form’ button found on the ‘Forms’ page.
You will be given two choices; Landing Pages and Form. Choose Form.
Next, choose INLINE
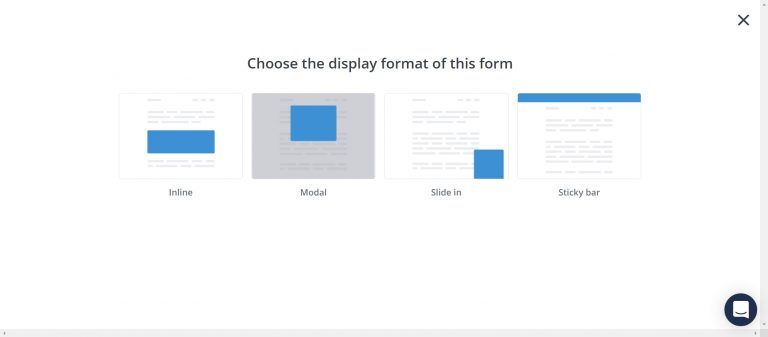
Here ConvertKit will give you a choice of several different design styles. I’ve chosen the first one.
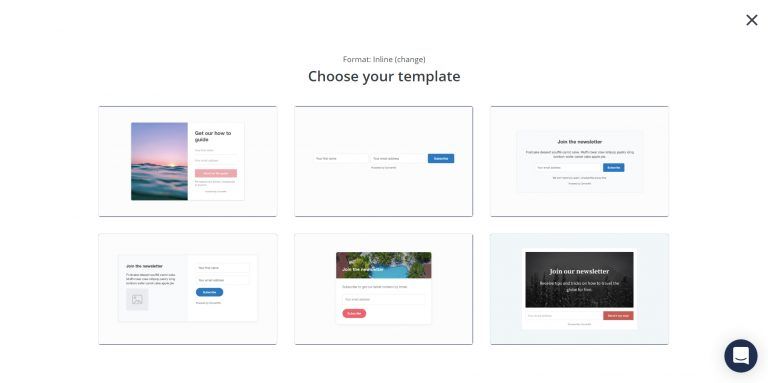
Now you can design the form to your preference. Just click anywhere on the form to access the design options that come up on the right-hand side. Changing the text is simple; just type directly onto the form and text away!
Once you’re done, click the preview button to see what your form will look like.
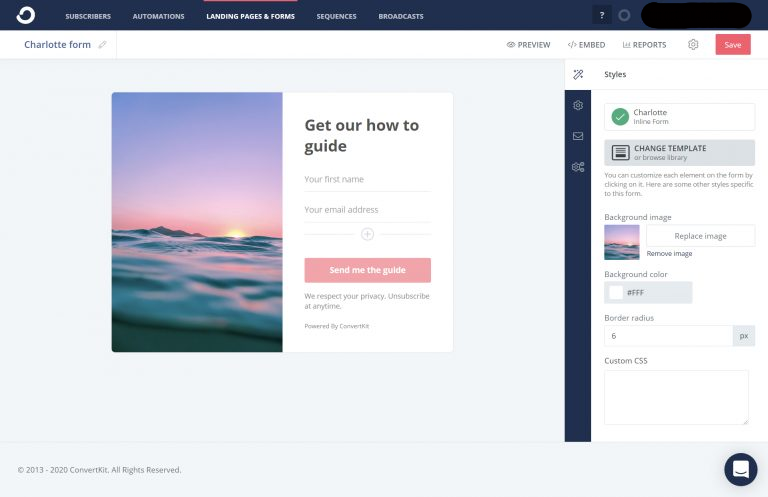
When you’re done, click SAVE and then click the GEAR ICON that’s immediately below the pencil icon. This will help you choose what you want to happen when a visitor signs up to your mail list.
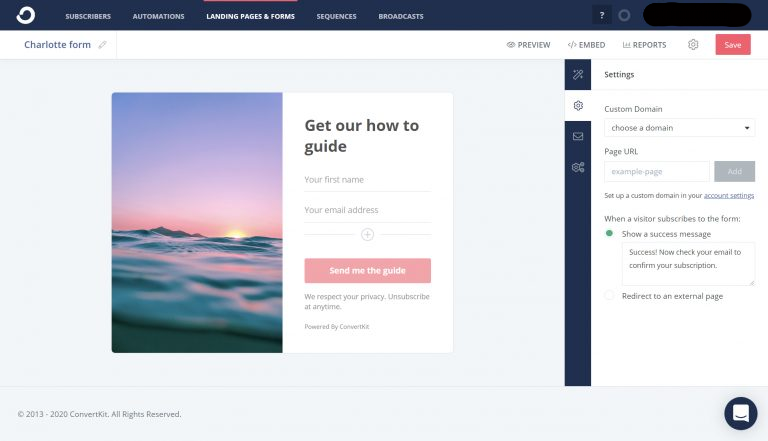
Ignore the CUSTOM DOMAIN tab and scroll down until you get to where it says, ‘When a visitor subscribes to the form:’ Select what you want to happen whether it’s the default that sends a generic success message.
If you want something different, you can change that generic message to say whatever you want it to say. Alternatively, you can opt to have your new subscriber redirected to a page of your choice.
Now you need to choose the EMAIL ICON section. Here you can choose between setting up an incentive email or the auto-confirming option for all subscribers. Okay, this might seem a bit complicated so let me explain a bit more.
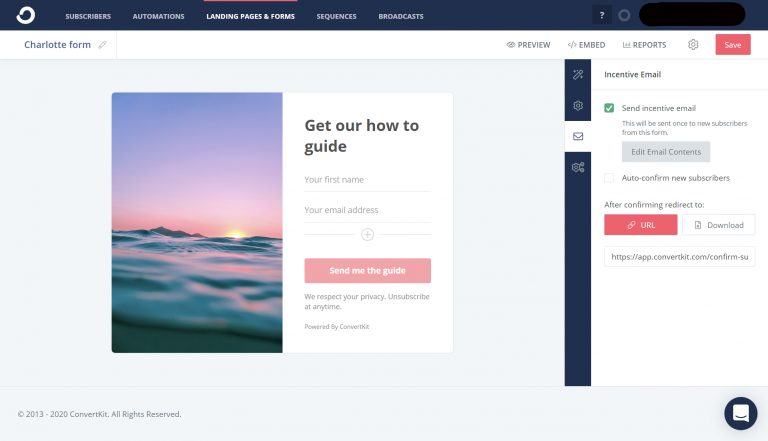
The auto-confirming tab automatically subscribes to all visitors. This is not a good idea for one specific reason. You see, any individual can type any email address into that box without verification and be automatically added to your mailing list. Not only is this illegal in many countries, but it could also put a damper on the success of your marketing campaigns because you end up with a bunch of spam subscribers.
So, in other words, always choose the incentive email and ensure that you set it up correctly. You’ll also need this email if you want to send your subscribers an opt-in offer.
To set up and edit your incentive email, click on the button that says EDIT EMAIL CONTENTS. The following screen will pop up...
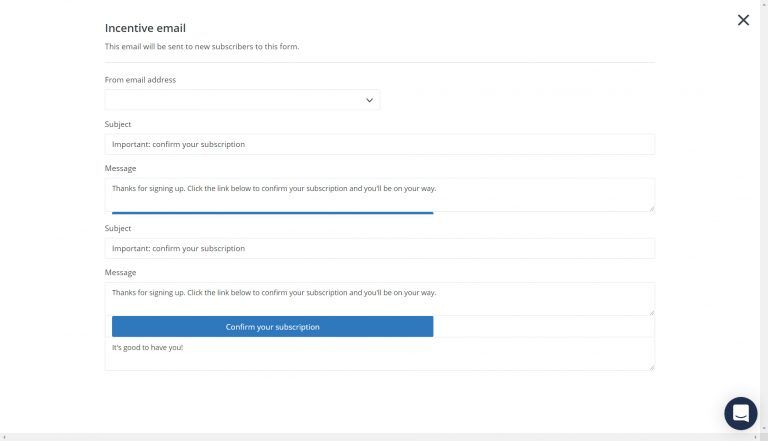
Now, select the correct ‘from’ email address from the drop-down menu and edit the subject line to something compelling.
You must be as straightforward as possible about what occurs when your subscribers click on the button. There are legal implications such as compliance with the General Data Protection Regulations of the EU. It’s also important because your new subscribers might feel tricked if they don’t know what their actions will result in.
You can put a disclaimer that alerts your new subscribers that clicking the button will automatically add them to your subscription list.
ConvertKit has a very convenient feature that allows you to offer your new subscribers a freebie when they sign up to be part of your mailing list. This double-opt option is incredible if you want a simplified sign-up process for your subscribers.
Again always let your subscribers know that by clicking the link for the freebie, they will be confirming their email address and allowing you to contact them as part of your mailing list.
If you don’t have an incentive no need to worry. ConvertKit allows you to add a URL you want people to go to when they click on the link. This link could be to your homepage, but most professional companies create a confirmation page on their website.
Once you’re done with the incentive email, click the cross in the top right-hand corner to return to the main menu.
Step 3:
Adding the form to your website
The next thing you need to do is to add the form to your website. So you’ll have to grab the code to embed this form into your website. Click on the tab that says EMBED in the top right.
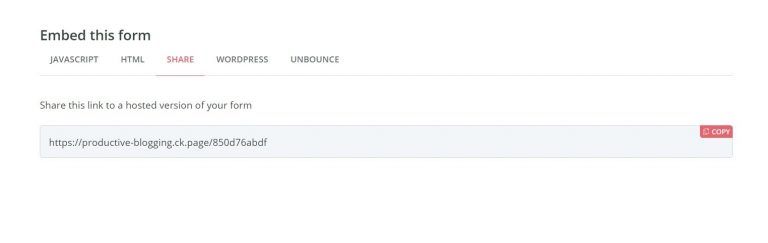
You have two options; you can grab the code and paste it into your blog post. Depending on the plugin tools you have, you can select the text editor if you use the classic editor plugin or the custom HTML block if you use Gutenberg.
An alternative is to paste the code into a widget space. You can also share the form as a link using the SHARE option. This link can be used on social media.
If you’re using WordPress, the easiest thing is to install the ConvertKit plugin. Once you activate it, set it up with the API key that you’ll find in your account settings. Now, go to the page where you want to add your form. Use the form shortcode to embed it where you want it to go.
Now your form will be live on your website, and you can start receiving new subscribers.
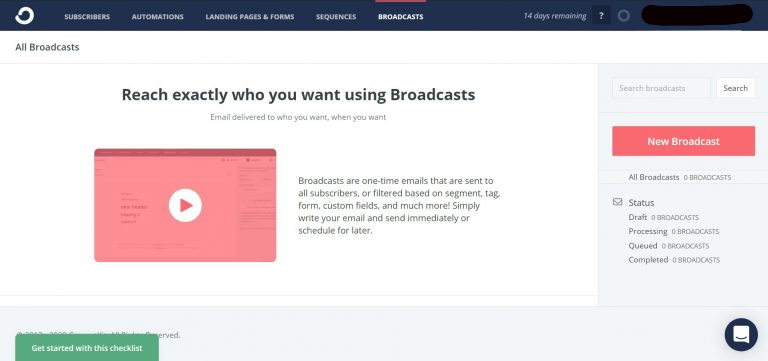
Step 4: How to create a broadcast (newsletter) in ConvertKit and send your first email
In ConvertKit, a Broadcast refers to a once-off email, for example, your newsletter. This is not to be confused with a Sequence that refers to a series of emails such as your welcome series. (We’ll discuss how to create a Sequence a bit later.)
To create a broadcast, click on the BROADCASTS tap at the top of your screen and choose NEW BROADCAST on the right-hand side.
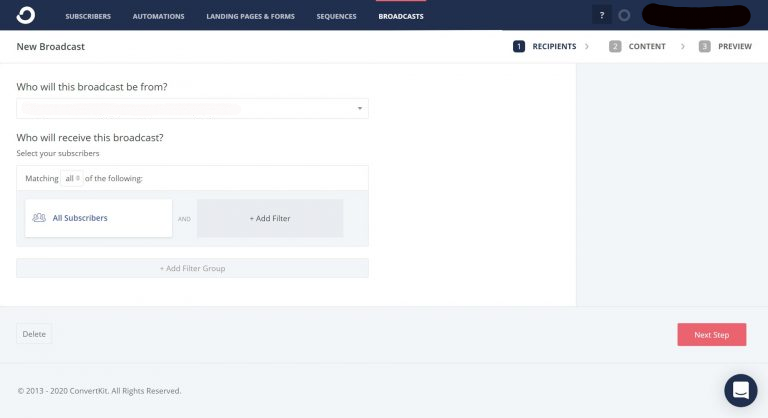
Here you’ll get a 3 step process that you’ll need to go through:
1. RECIPIENTS
If you’re still starting out, it’s best to leave this tab alone for the meantime. Once you’ve found your feet and can navigate your way around all the features of ConvertKit, you can choose who gets your broadcast from a whole range of options.
However, suppose. You,, click you want to send an email to everyone on your mailing list, you can leave this section in the default ALL SUBSCRIBERS setting and click on the NEXT STEP button.
2. CONTENT
The next screen that’ll pop up will look identical to a blank email.
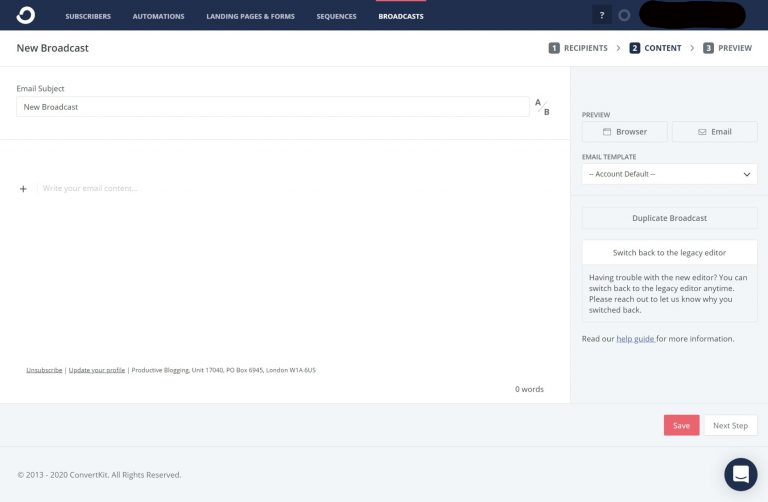
Here you can write your newsletter the same way you would any normal email. ConvertKit allows you to insert images, files, buttons, videos, etc., just simply click on the plus symbol on the left-hand side of the page.

The platform also gives you an option to preview what your email will look like on the right-hand side. The BROWSER tab will open up a preview in a new window on your internet browser.
The EMAIL tab will send the preview email to your email account for you to check. When you are satisfied with the text, select the NEXT STEP option in the bottom right.
3. PREVIEW
In this section, you will see a preview of your email, as well as several options about how you want to send it. You can choose to send the email immediately or click SCHEDULE to schedule the email to be sent in the future. Alternatively, you can also click SAVE DRAFT to save it and come back to it later.
A protip: If you realize you need to edit a broadcast before it’s sent, you have to un-schedule it first, and then you can edit it.
And that’s it!
Step 5:
How to create a sequence in ConvertKit
When you’re starting out, creating a sequence can be confusing. However, ConvertKit makes it easy because the process is the same regardless of the kind of sequence you want to make.
You can easily create a sequence that welcomes new subscribers to your email list. For example when you have a specific email course or a sales funnel.
To create a sequence first click on SEQUENCES in the top menu, then click NEW SEQUENCE on the right-hand side.
To help identify your sequences, it’s best to give each of your sequences a name. For example, you can create a welcome sequence for new subscribers or a re-engagement sequence for an abandoned shopping cart. Click on the CREATE SEQUENCE button.
You should get a screen that looks like this…
Now write your first email usually but ensure that you change the WHEN TO SEND option to IMMEDIATELY. This makes sure that your new subscribers will get your welcome series as soon as they sign up.
Next, set the status to PUBLISHED once you’ve finished.
If you need to add more emails to the sequence, keep clicking on the ADD EMAIL button on the left-hand side.
For the following sequence of emails, you can set the WHEN TO SEND option to 1 DAY or any number of days after the first email. Remember to save your sequence.
Step 6: How to create automation in ConvertKit
ConvertKit has one of the best visual automation editors. This feature allows you to set up visual rules and pathways which determine precisely who gets which emails and when. The fact that the editor is visual makes it extremely easy to understand.
To start, simply click on AUTOMATONS in the top menu and then choose the NEW AUTOMATION option over on the right-hand side.
The next step is to give your automation a name and then click CREATE AUTOMATION.
If we use our welcome series example, you’ll want to click the JOIN A FORM option and then pick the form you created in step 2 from the drop-down list. Then hit ADD EVENT.
Now click the plus sign found immediately below your form. Pick the ‘add a subscriber to… EMAIL SEQUENCE’ option and choose the sequence you created in step 4 from the drop- down list and ADD ACTION.
The last step is to move the toggle on the top right hand corner from PAUSED to LIVE, and your email sequence will now go out to everyone who has subscribed using that form.
Now the next thing you need to avoid is to send a welcome sequence to all your subscribers over and over again. Luckily ConvertKit has a feature that allows you to exclude existing subscribers from receiving specific sequences.
Step 7: Excluding/ Tagging subscribers from email sequence in ConvertKit (creating segments)
Assigning tags or labels to your subscribers will help you keep track of individual actions. For example, suppose you have a specific new event where several but not all your subscribers have signed up. In that case, you can tag those particular individuals only.
Tagging or segmenting your subscribers also gives you an option to send out an email to everyone BUT people with this tag.
Additionally, you can create interest-based tags that are interest-based. Suppose you run an e-commerce store that offers different categories of products on your site. In that case, you’ll want to track who’s interested in what. And tailor-make your marketing campaigns.
Segments of this kind are also great if you want to create a group of emails for people who signed up through different forms or have tags that you want to combine. For example, you could have tags for all the different events you’ve done or products you’ve sold. Now you can create a segment for all your former event attendees or buyers.
To simplify, try to use tags for single actions and segments for groups of actions.
To do this, simply choose SUBSCRIBERS from the top menu. You’ll see the tags section on the right. Next, click the CREATE A TAG button and give your name a tag. For example, you can say something like ‘EXISTING SUBSCRIBER.’
If you check on the left, you’ll see small check-boxes next to each subscriber’s name. Click the checkbox at the top, and it will select all the subscribers on that page. It will also give you an option to select ALL your subscribers.
If that’s what you intend to do, then select that option and then click on the BULK ACTIONS => TAG. Now choose that tag you just created, and all your existing subscribers will now be tagged.
Next, go back to SEQUENCES and pick that sequence you made in Step 5. Select SETTINGS and scroll down to the ‘Exclude subscribers from this sequence.’
Now click TAGS and select the tag you just created and save. And that’s it! All your existing subscribers are now excluded from your new welcome series.
Conclusion
Pat yourself on the back for getting this far. You now know how to successfully create a form and start collecting new subscribers. You’ve also learned how to send a newsletter and a welcome sequence, create visual automation, tag a subscriber, and how to exclude certain subscribers from a sequence.
Hopefully, now you’ve got a sense of just how awesome ConvertKit is and all the wonderful features at your disposal. ConvertKit is extremely easy to use. I hope you’ll give it a try!